How to Sign a Word Document on Mac

If you need to insert your handwritten signature in Word, you have a couple of easy ways to do it on both Windows and Mac.
When you create a document in Microsoft Word, you can add a handwritten signature on both Windows and Mac. This is useful for letters, creative works, and even legal documents that you need to email someone.
You can add a signature in Word in a couple of different ways, with an image or the Draw feature. We'll show you how to do both and have a bonus for you at the end of this tutorial to create a reusable signature.
Insert an Image of Your Signature in Word
If you already have an image of your signature on your computer, you're one step ahead. You can insert that image quickly and easily. Then, crop it or add some typed text below it if you like such as your job title, the date, or your phone number.
- Place your cursor on the spot in your document where you want your signature.
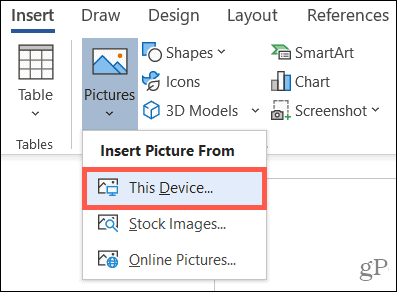
- Go to the Insert tab and select Pictures. On Windows, choose This Device in the ribbon. On Mac, pick Picture From File.
- Browse for and choose the image, click Insert.

To crop the image:
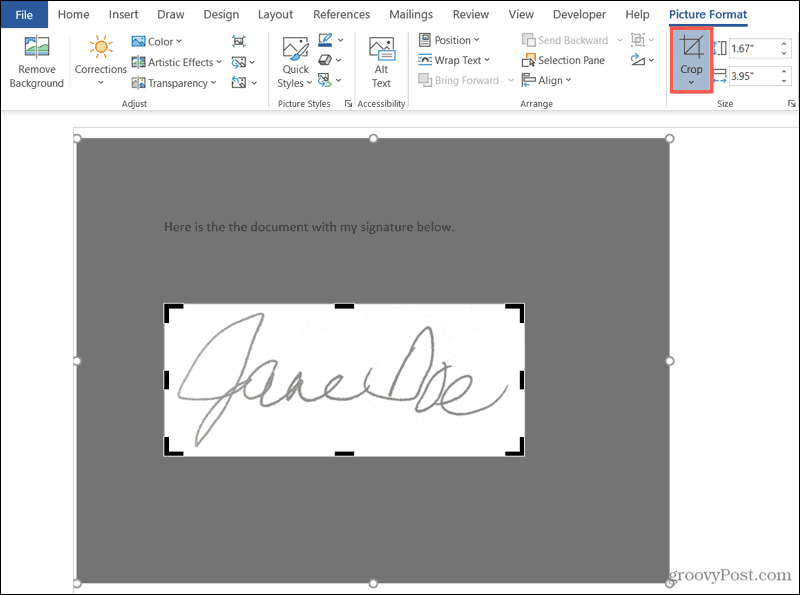
- Select the image and click the Picture Format tab that appears.
- Click Crop in the ribbon.
- Drag the edges of the image to keep only the part you want and hit Enter or Return.

You can also take advantage of the other image editing tools in Word on the Picture Format tab if you like. Add a picture style or use the Corrections drop-down to adjust the brightness and contrast.
To add text, simply go to the line beneath the image and type in what you like.
Use the Draw Tool to Sign the Word Document
If you don't have an image of your signature, you can use Word's Draw tab to create your signature using your mouse or touchpad.
- Place your cursor on the spot in your document where you want your signature.
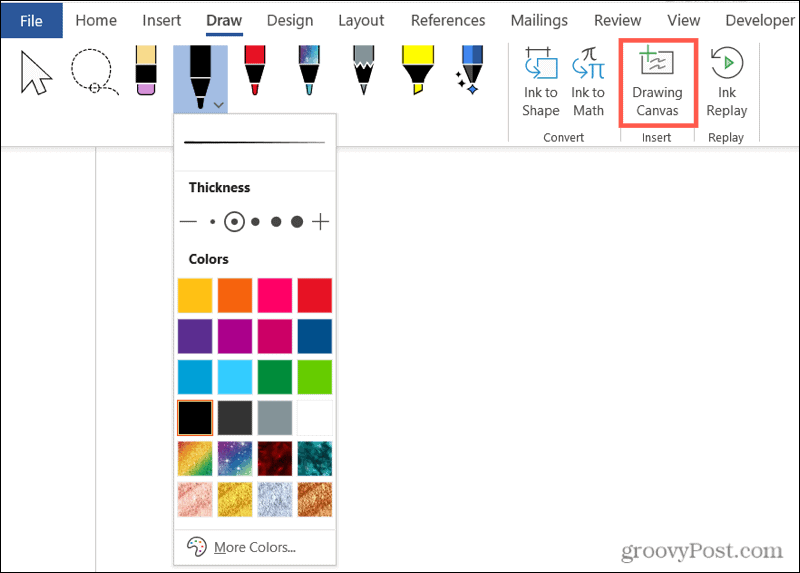
- Go to the Draw On Windows, select Drawing Canvas in the ribbon. On Mac, you can choose Draw with Trackpad if applicable.
- Choose a drawing tool like the black pen. Click the drop-down for the tool to change the color or thickness of the line.
- Use your mouse or touchpad to sign your name inside the canvas.

Once you finish, you can drag the edges of the drawing canvas to resize it or drag it to a different location in the document. Just like when you insert an image of your signature, you can add text on the line below it if you wish.

Bonus: Create a Reusable Signature with Text
If you plan to reuse the signature and the text that you add as described above, you can save it altogether. This allows you to insert it easily in future documents you create.
Save a Reusable Signature on Windows
- Select the image of your signature and the text beneath it.
- Go to the Insert tab and click Quick Parts > Save Selection to Quick Part Gallery.
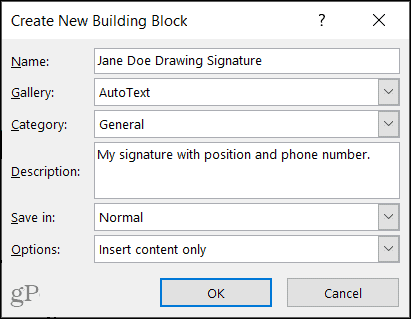
- In the pop-up window, add a Name you'll recognize and choose AutoText in the Gallery drop-down list.
- Click OK.

When you want to add your signature and text, place your cursor in the document where you want it and go to the Insert tab. Click Quick Parts > AutoText and choose the name you gave it.

Save a Reusable Signature on Mac
- Select the image of your signature and the text beneath it.
- Click Insert from the menu bar and pick AutoText > New.
- In the pop-up window, give it a Name you'll recognize.
- Click OK.

To add the signature and text, place your cursor in the document where you want it. Click Insert > AutoText from the menu bar. Pick AutoText, look for the name you chose in the list, and select it. Click the Insert button.

Insert Your Handwritten Signature in Word on Windows or Mac
With an image you scanned and saved or the convenient drawing tool, you have two simple ways to insert your handwritten signature in Word. And hopefully, the bonus instructions for saving that signature and the text you add to it will come in handy too!

How to Sign a Word Document on Mac
Source: https://www.groovypost.com/howto/add-a-handwritten-signature-to-a-word-document/